Ferrum
Ferrum (Ferrum Community Authorization Server) is a Authorization Server that is
- :comet:fast, see
- :fire:low resource consumption,
- :heavy_check_mark:fully tested including performance testing
- :closed_lock_with_key: secure with protection from passwords brute-forcing


![]()
![]()

1. Why Ferrum
1.1 Main Ferrum advantages:
- :white_check_mark: Simple configuration and start either as a native app or an
dockercontainerized app; - :sparkles:
Keycloak-compatible API - :boom: Can be embedded inside any application or used as a standalone application
- :film_strip: Can be simply install absolutely with no dependent services to single board computer with
low resource usage, requires40-50 MbofRAMwith up to100 - 200 users; - :stars: fast (there are no performance test yet, but they will be written during the
0.9.3version) with aim to be serving up to10K users on a single node,0.9.3.rc1K6automated performance tests shows 500 users simultaneous work with~20ms 99% of requestswith <130 Mb of RAMand2 CPU Coresusage; - :heavy_check_mark:
Ferrumis widely covered by unit and integration tests every push ondevelopormasterruns tests and static analyze check withlinters. - :desktop_computer:
metricsallow to control all HTTP-requests duration and those part related to data storage access with count three groups by request time -p50,p90andp99also metrics count total amount of requests and errors during requests handling. - :microscope: during to modular parts and interface usage,
Ferrumcould be used with any type of persistent storage
2. Communication
3. General info
Ferrum is OpenId-Connect Authorization server written on GO. It has Data Contract similar to
Keycloak server (minimal Keycloak and we’ll grow to full-fledged KeyCloak analog).
Today we are having following features:
Issuenewtokens.Refresh tokens.- Control user sessions (token expiration).
- Get
UserInfo. - Token
Introspect. - Managed from external code (
StartandStop) making them an ideal candidate for using in integration tests for WEB API services that usesKeycloakas authorization server; - Ability to use different data storage:
FILEdata storage for small Read only systemsREDISdata storage for systems with large number of users and small response time;
- Ability to use any user data and attributes (any valid JSON but with some requirements), if you have to
properly configure your users just add what user have to
data.jsonor in memory - Ability to become high performance enterprise level Authorization server.
it has endpoints SIMILAR to Keycloak, at present time we are having following:
- Issue and Refresh tokens:
POST ~/auth/realms/{realm}/protocol/openid-connect/token - Get UserInfo
GET ~/auth/realms/{realm}/protocol/openid-connect/userinfo - Introspect tokens
POST ~/auth/realms/{realm}/protocol/openid-connect/token/introspect
4. How to use
4.1 Build
First of all build is simple run go build from application root directory. Additionally it is possible
to generate self signed certificates - run go generate from command line
If you don’t specify the name of executable (by passing -o {execName} to go build) than name of executable = name of project
For running static analyze check use command golangci-lint run
4.2 Run application as Standalone
Run is simple (Ferrum starts with default config - config.json):
./Ferrum
To run Ferrum with selected config i.e. config_w_redis.json :
./Ferrum --config ./config_w_redis.json
4.3 Run application in docker
It is possible to start app in docker with already installed REDIS and with initial data (see python
data insert script):
docker-compose up --build
4.4 Run with direct configuration && data pass from code (embedding Authorization server in you applications)
There are 2 ways to use Ferrum:
- Start with config file (described above)
- Start with direct pass
config.AppConfiganddata.ServerDatain application, i.e.app := CreateAppWithData(appConfig, &testServerData, testKey) res, err := app.Init() assert.True(t, res) assert.Nil(t, err) res, err = app.Start() assert.True(t, res) assert.Nil(t, err) // do what you should ... app.Stop()
4.5 Testing
4.5.1 Functional testing
At present moment we have 2 fully integration tests, and number of them continues to grow. To run test execute from cmd:
go test
For running Manager tests on Redis you must have redis on 127.0.0.1:6379 with ferrum_db / FeRRuM000 auth user+password
pair, it is possible to start docker_compose and test on compose ferrum_db container
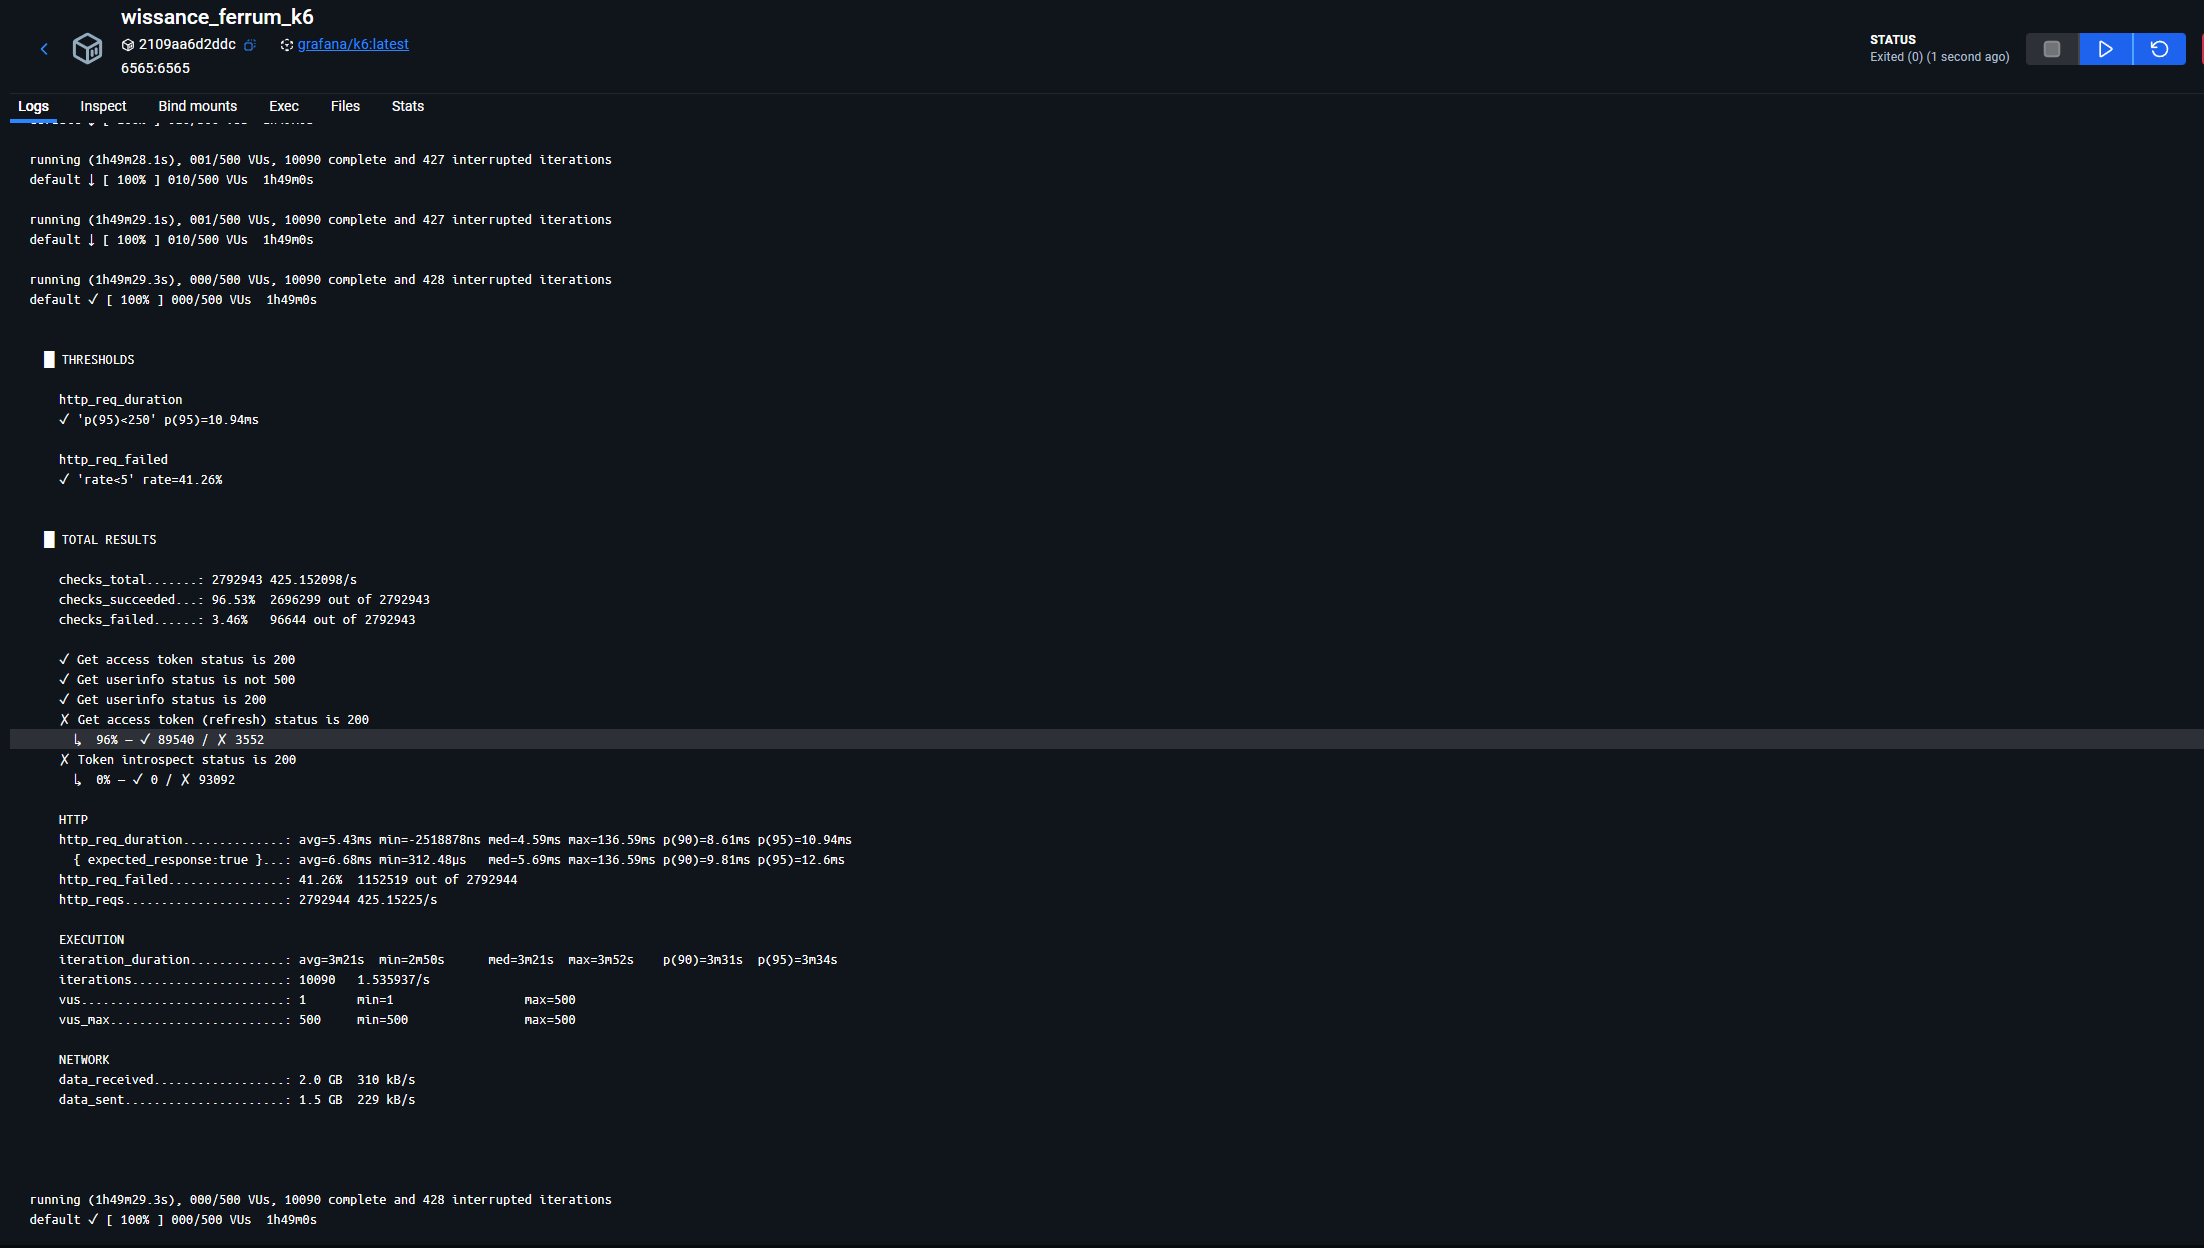
4.5.2 Performance testing
Performance test running automatically with K6 included in separate docker-compose running with powershell script - start_docker_perftests.ps1. K6 tests itself located in tools folder started with prefix k6:
k6_smoke_test.js- small load with 10 users with 1 min duration;k6_average_load_test.js- average load with up to 500 users running ~1 hourk6_high_load_test.js- high load up to 10000 users ~1 day
Result of running avg load - 10 ms average response time, p99 (99% of requests) duration around 20 ms, maximum RAM usage during this test is 130 Mb and takes 2 CPU Cores, see results below:
And Summary of result from the K6 window:
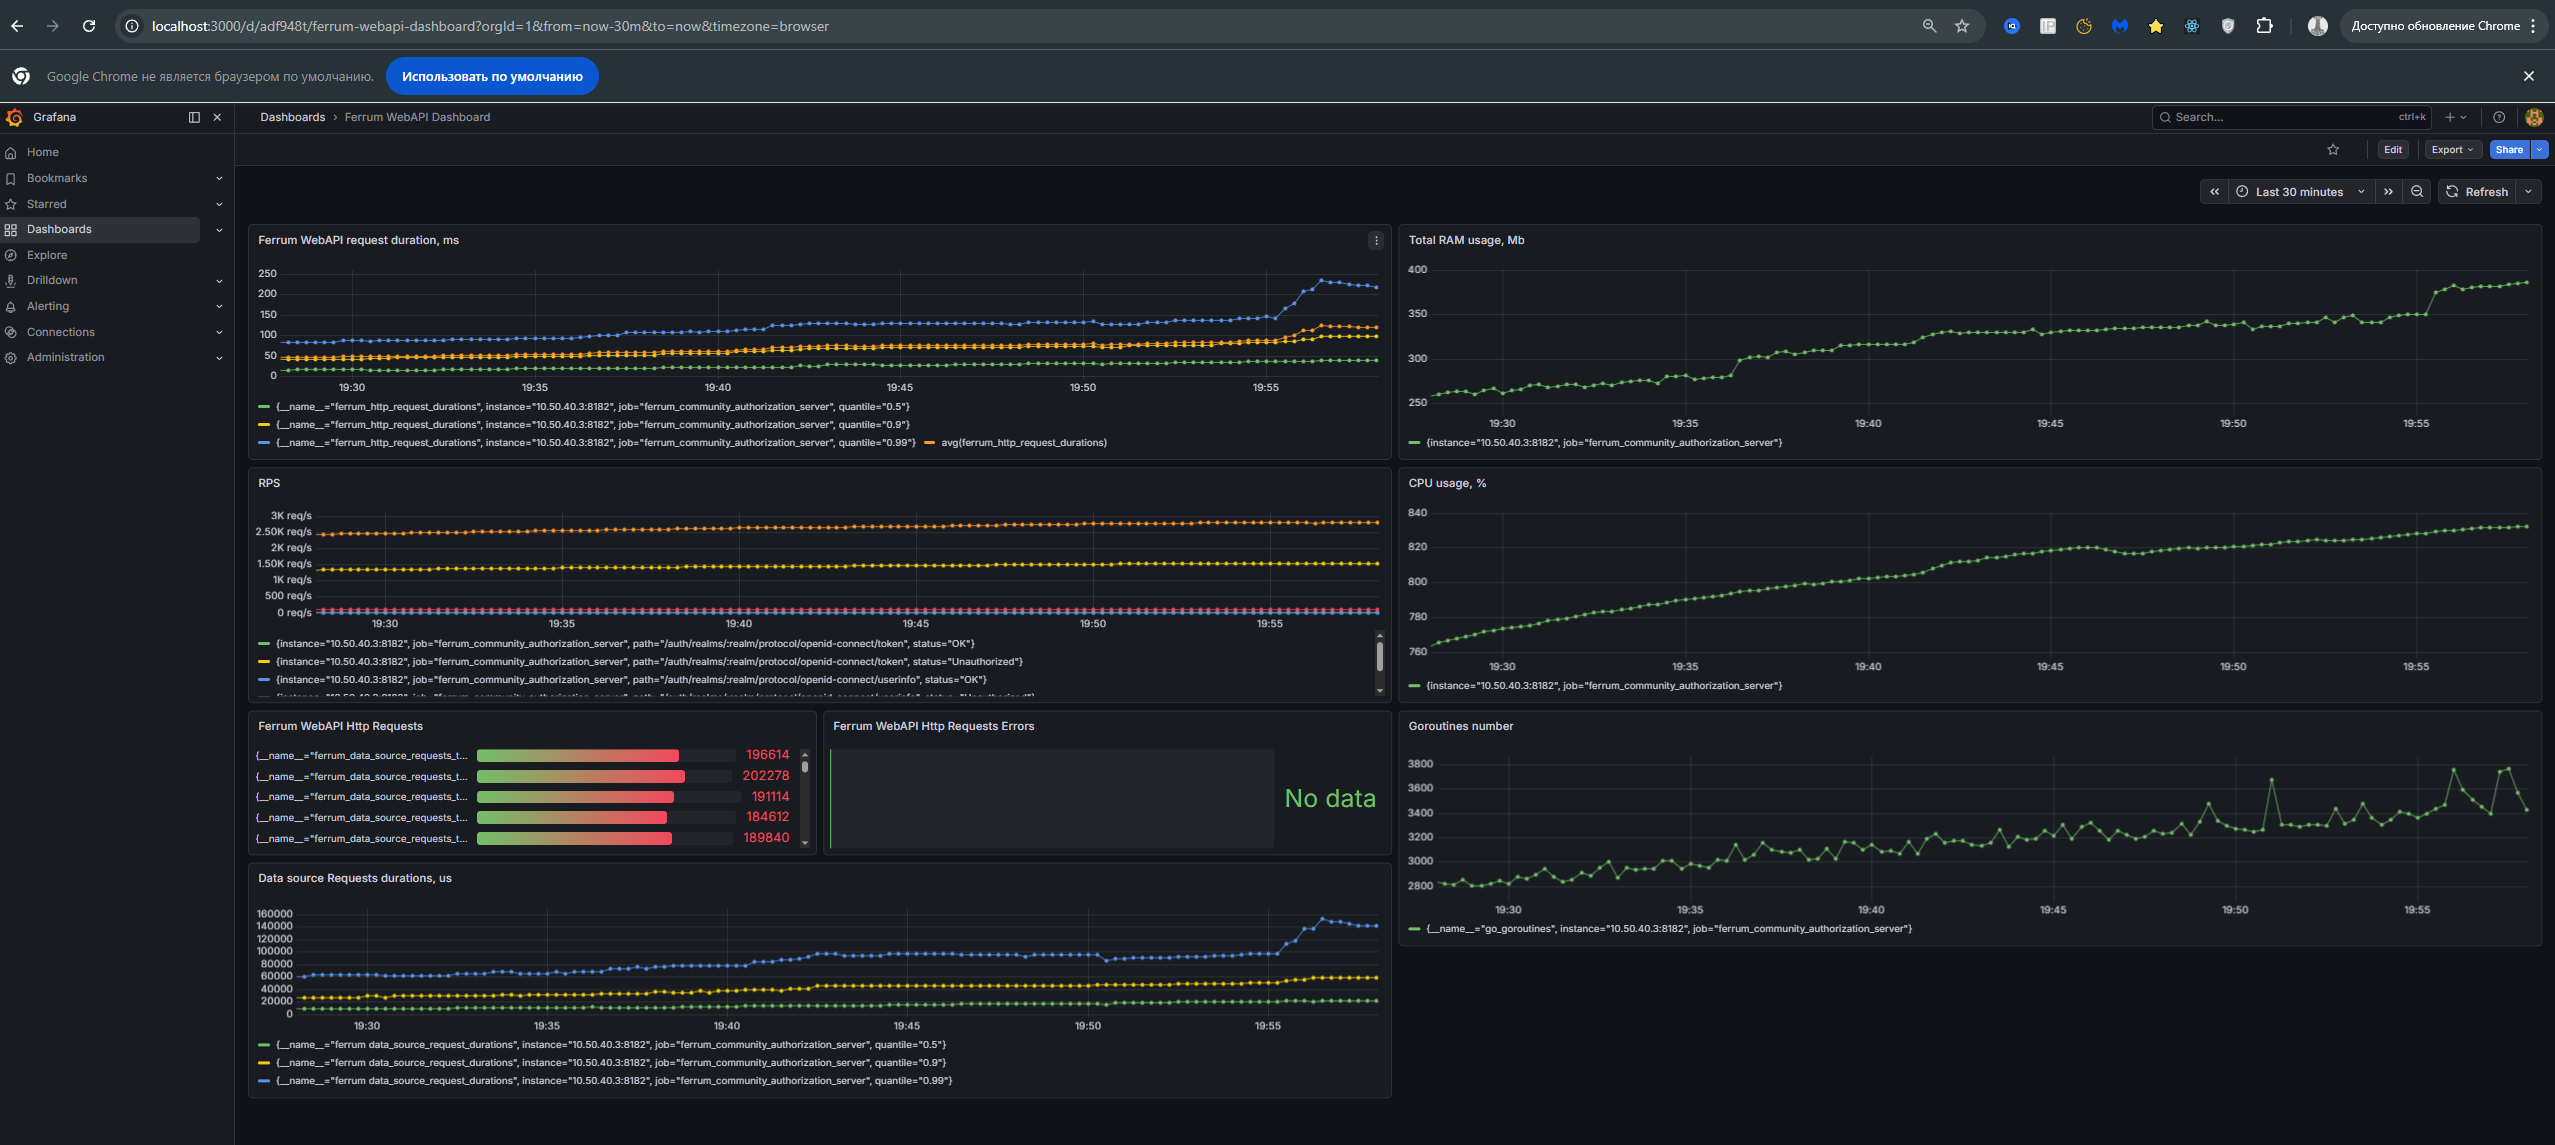
Result of running high load - ~3500 users and 5000 RPS gives ~400Mb usage and 8 CPU Cores with p95 ~70-80 ms, see:
5. Configure
5.1 Server configuration
Configuration splitted onto several sections:
    ```json
    "server": {
        "schema": "https",
        "address": "localhost",
        "port": 8182,
        "security": {
            "key_file": "./certs/server.key",
            "certificate_file": "./certs/server.crt"
        }
    }
    ```
  - data file: `realms`, `clients` and `users` application takes from this data file and stores in
    app memory, data file name - `data.json`
  - key file that is using for `JWT` tokens generation (`access_token` && `refresh_token`),
    name `keyfile` (without extensions).
5.2 Configure user data as you wish
Users does not have any specific structure, you could add whatever you want, but for compatibility with keycloak and for ability to check password minimal user looks like:
{
    "info": {
        "sub": "" // <-- THIS PROPERTY USED AS ID, PROBABLY WE SHOULD CHANGE THIS TO ID
        "preferred_username": "admin", // <-- THIS IS REQUIRED
        ...
    },
    "credentials": {
        "password": "1s2d3f4g90xs" // <-- TODAY WE STORE PASSWORDS AS OPENED
    }
}
in this minimal user example you could expand info structure as you want, credentials is a service structure,
there are NO SENSES in modifying it.
5.3 Server embedding into application (use from code)
Minimal full example of how to use could be found in application_test.go, here is a minimal snippet:
var (
	testSalt           = "salt"
	encoder            = encoding.NewPasswordJsonEncoder(testSalt)
	testHashedPassword = encoder.GetB64PasswordHash("1234567890")
	testKey            = []byte("qwerty1234567890")
	testServerData     = data.ServerData{
		Realms: []data.Realm{
			{
				Name: testRealm1, TokenExpiration: testAccessTokenExpiration, RefreshTokenExpiration: testRefreshTokenExpiration,
				Clients: []data.Client{
					{Name: testClient1, Type: data.Confidential, Auth: data.Authentication{
						Type:  data.ClientIdAndSecrets,
						Value: testClient1Secret,
					}},
				},
				Users: []interface{}{
					map[string]interface{}{
						"info": map[string]interface{}{
							"sub":  "667ff6a7-3f6b-449b-a217-6fc5d9ac0723",
							"name": "vano", "preferred_username": "vano",
							"given_name": "vano ivanov", "family_name": "ivanov", "email_verified": true,
						},
						"credentials": map[string]interface{}{"password": testHashedPassword},
					},
				},
				PasswordSalt: testSalt,
			},
		},
	}
)

var httpsAppConfig = config.AppConfig{ServerCfg: config.ServerConfig{Schema: config.HTTPS, Address: "127.0.0.1", Port: 8672,
	Security: config.SecurityConfig{KeyFile: "./certs/server.key", CertificateFile: "./certs/server.crt"}}}

app := CreateAppWithData(appConfig, &testServerData, testKey)
res, err := app.Init()
if err != nil {
	// handle ERROR
}

res, err = app.Start()

if err != nil {
	// handle ERROR
}

// do whatever you want

app.Stop()
6. Server administer
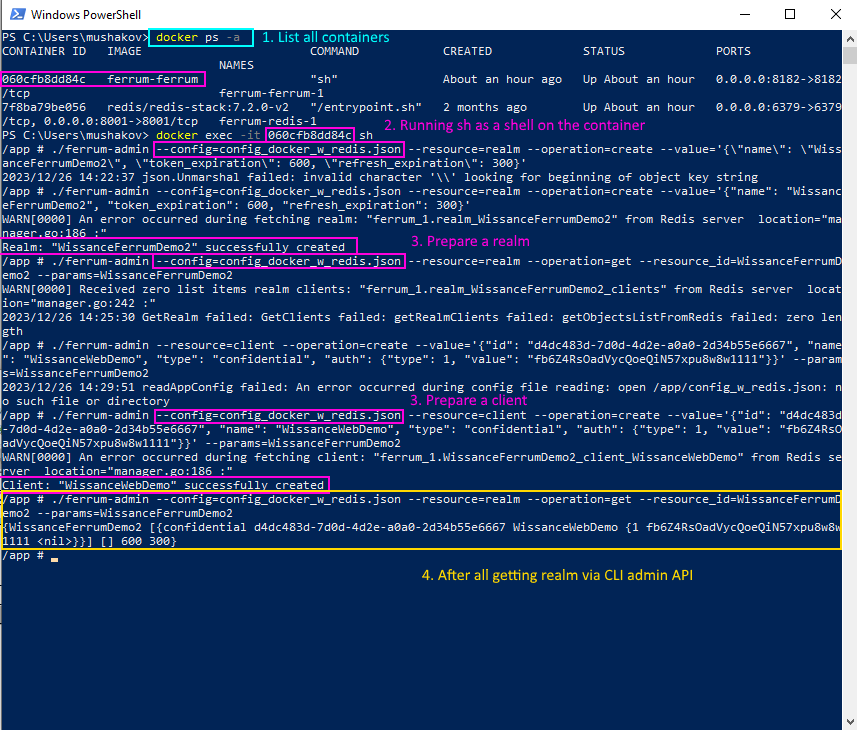
Since version 0.9.1 it is possible to use CLI Admin See
6.1 Use CLI admin in a docker
- Run docker compose -
docker compose up --build - List running containers -
docker ps -a - Attach to running container using listed hash
docker exec -it 060cfb8dd84c sh - Run admin interface providing a valid config
ferrum-admin --config=config_docker_w_redis.json ..., see picture
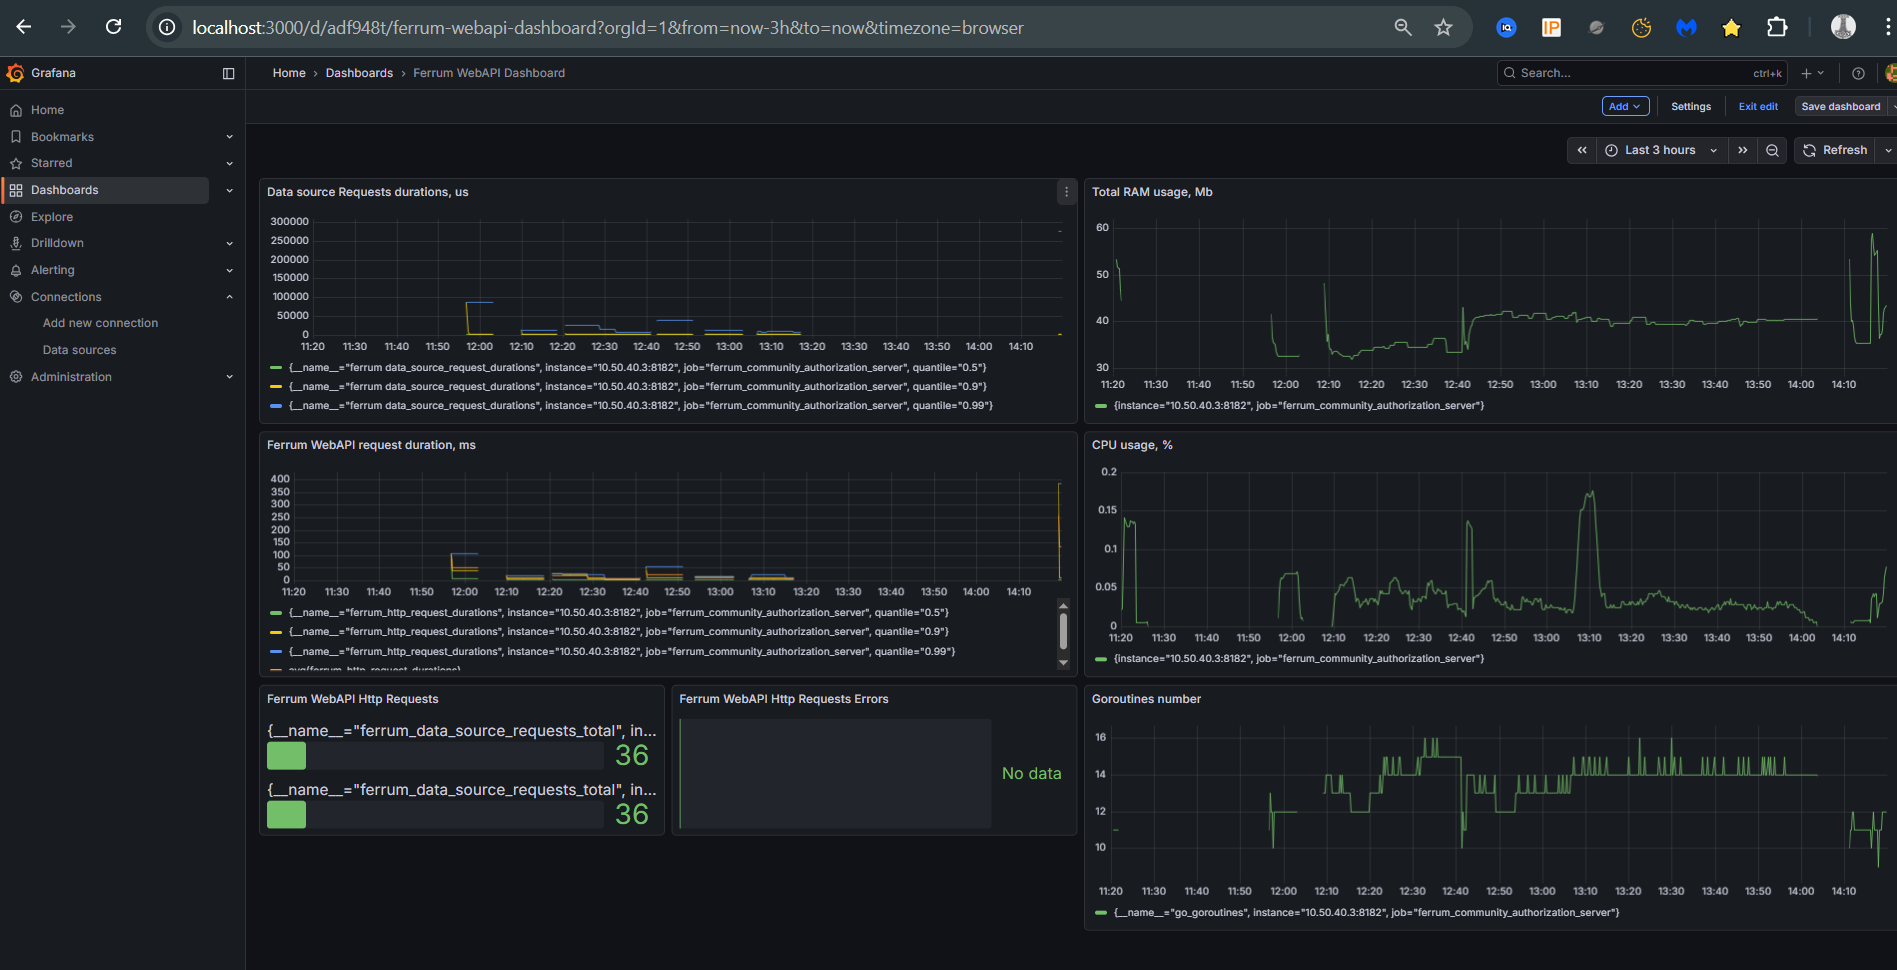
6.2 Observability (SRE)
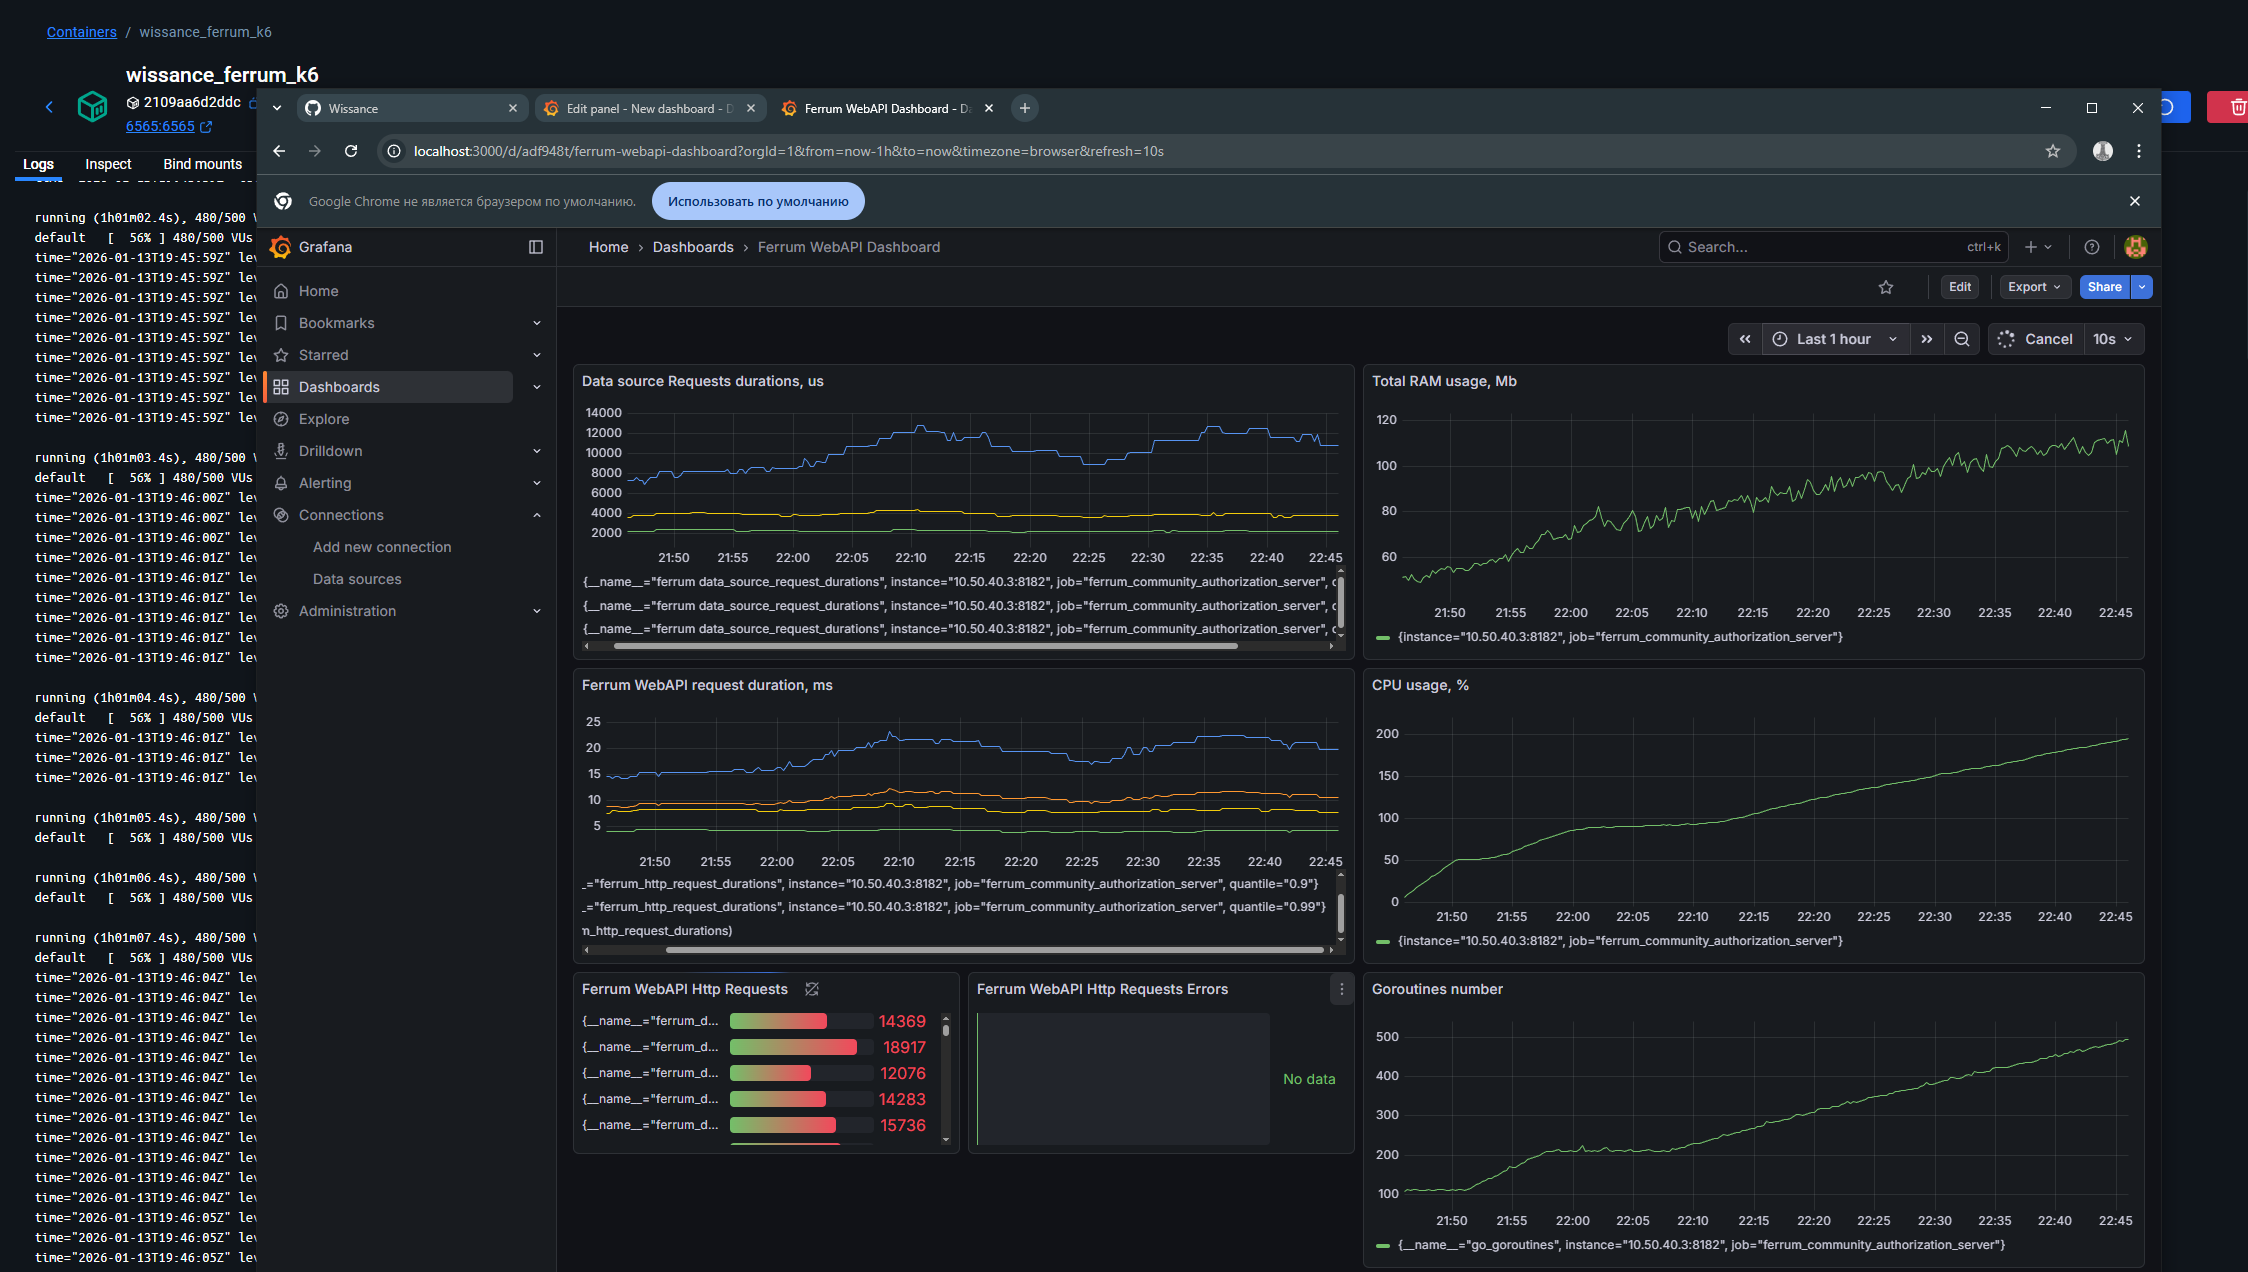
For checking application state, we could query the ~/metrics endpoint (i.e., for local instance full URL - http://127.0.0.1/metrics). But starting with 0.9.3.rc1 were added prometheus and grafana to be running simultaneously with Ferrum using docker-compose. Grafana model could be found here. It requires only replacing the Prometheus ID.
Grafana model allows us to observe the following:
HTTP-requestduration with calculation average requests duration.- The total number of
HTTP-requestand requests ended with4xxand5xxstatus codes. - Data source operation duration to see where it could be the bottleneck and observe
CLIadmin interface too. - Resident memory consumption
CPUin % consumption- Number of goroutines used by Go
RPS
Screenshot with grafana dashboard:
7. Changes
Brief info about changes in releases.
7.1 Changes in 0.0.1
Features:
Keycloakcompatible HTTP-endpoints to issue a newtokenand to getuserinfo
7.2 Changes in 0.1.0
Features:
- documentation (
readme.mdfile) - integration tests
7.3 Changes in 0.1.1
Features:
- fixed modules names
7.4 Changes in 0.1.2
Features:
- changed module names to make it available to embed
Ferrumin an other applications
7.5 Changes in 0.1.3
Features:
Keycloakcompatible HTTP-endpoint for token introspect
7.6 Changes in 0.1.4
Features:
- removed
/therefore it is possible to interact withFerrumusinggo-cloakpackage
7.7 Changes in 0.9.0
Features
- logging
- implemented token refresh
- better docs
7.8 Changes in 0.9.1
Features:
docker&&docker-composefor app running- admin
CLIAPI Redisas a production data storage
7.9 Changes in 0.9.2
Features:
- admin cli added to docker
- test on
Redisdata manger - used different config to run locally and in docker
- newer
Keycloakversions support - checked stability if
Redisis down,Ferrumdoes not crushes and wait untilRedisis ready swagger(-devmodeoption in cmd line) andKeycloakcompatible HTTP endpointopenid-configuration- support for federated user (without full providers impl, just preliminary)
- store password as a hashes
7.10 Changes in 0.9.3.rc1
- created
service admin accountand server settings - created rules of matrix to check allowed operations with domain objects based on current user
- added
SRE metricsto checkFerrumstate withGrafanadashboard - added automatic tests with
K6and checked performance with~20mson request with 500 users simultaneously.
7.11 Changes in 0.9.3.rc2
- switched from
gorilla/muxtogin-gonic/gin - confirmed that
Ferrumcould handle~3500 users with 5000 RPS
7.12 Changes in 0.9.3
- added brute-force protection (block by
IP address(APIclient) ordevice Id(browser) after 100 unsuccessful attempts), also were added manual block and unblock
8. Contributors